Creating Garmin Explore Tracks

One of the first things I found when trying to create a track that I could use on my Zumo XT was that there isn’t any easy way to do it, the Garmin Explore web interface is good for managing your assets (waypoints, routes, tracks, etc) and works ok for creating easy point-to-point tracks/routes but isn’t great for more complex track creation.

After a lot of trial and error, I’ve found that the following workflow works best for me when I’m mapping out a new trip.

What I’ve found is using Google Maps works best for me when mapping out a route that is along roads, even when they are back country dirt roads, as long as Google Maps shows them when you zoom in you can use it to create your track for your Garmin Zumo XT (or any Garmin that syncs with Garmin Explore) and I’ve found using Google Earth works best for creating an off-road route.

Creating a on-road route

The first thing we need to do is create a Google Map that we can save

  1. Go to your saved Google Maps page https://www.google.com/maps/d/u/1/ (you will need to sign into your Google account if you are not already)
  2. On the top left of the page click the “+ CREATE A NEW MAP” button
  3. This will open what looks like the normal Google Maps page with a few differences
  4. Click the “Untitled map” title on the top left and name your map
  5. Click the add directions icon that is under the search bar
  6. This will create a new “Untitled layer” that says “Driving” with a “A” and “B” section
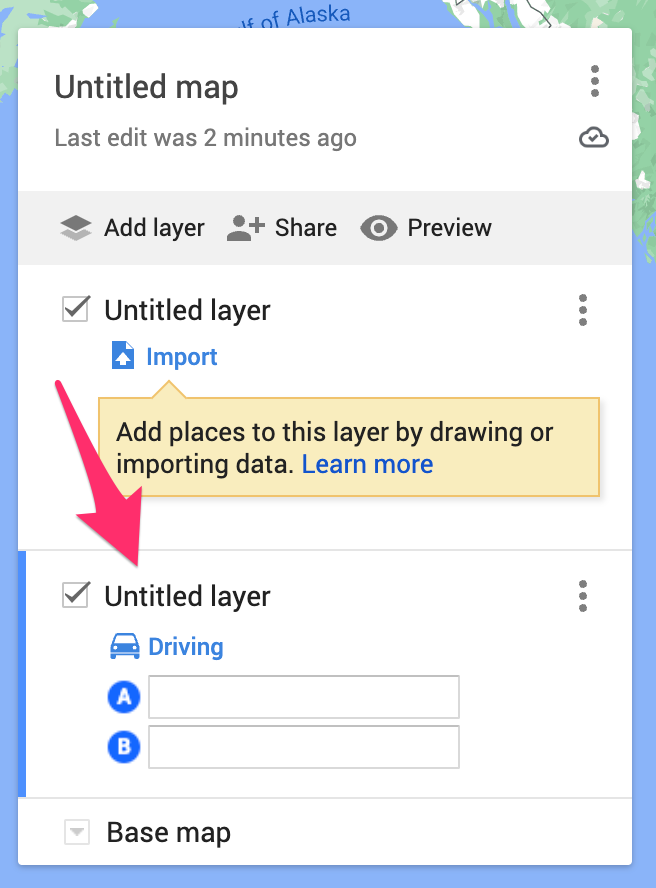
  7. You can now set the “A” (starting location) and “B” (next stop location)
  8. After you’ve added a “B” location you can add more stops and it will map them out for you
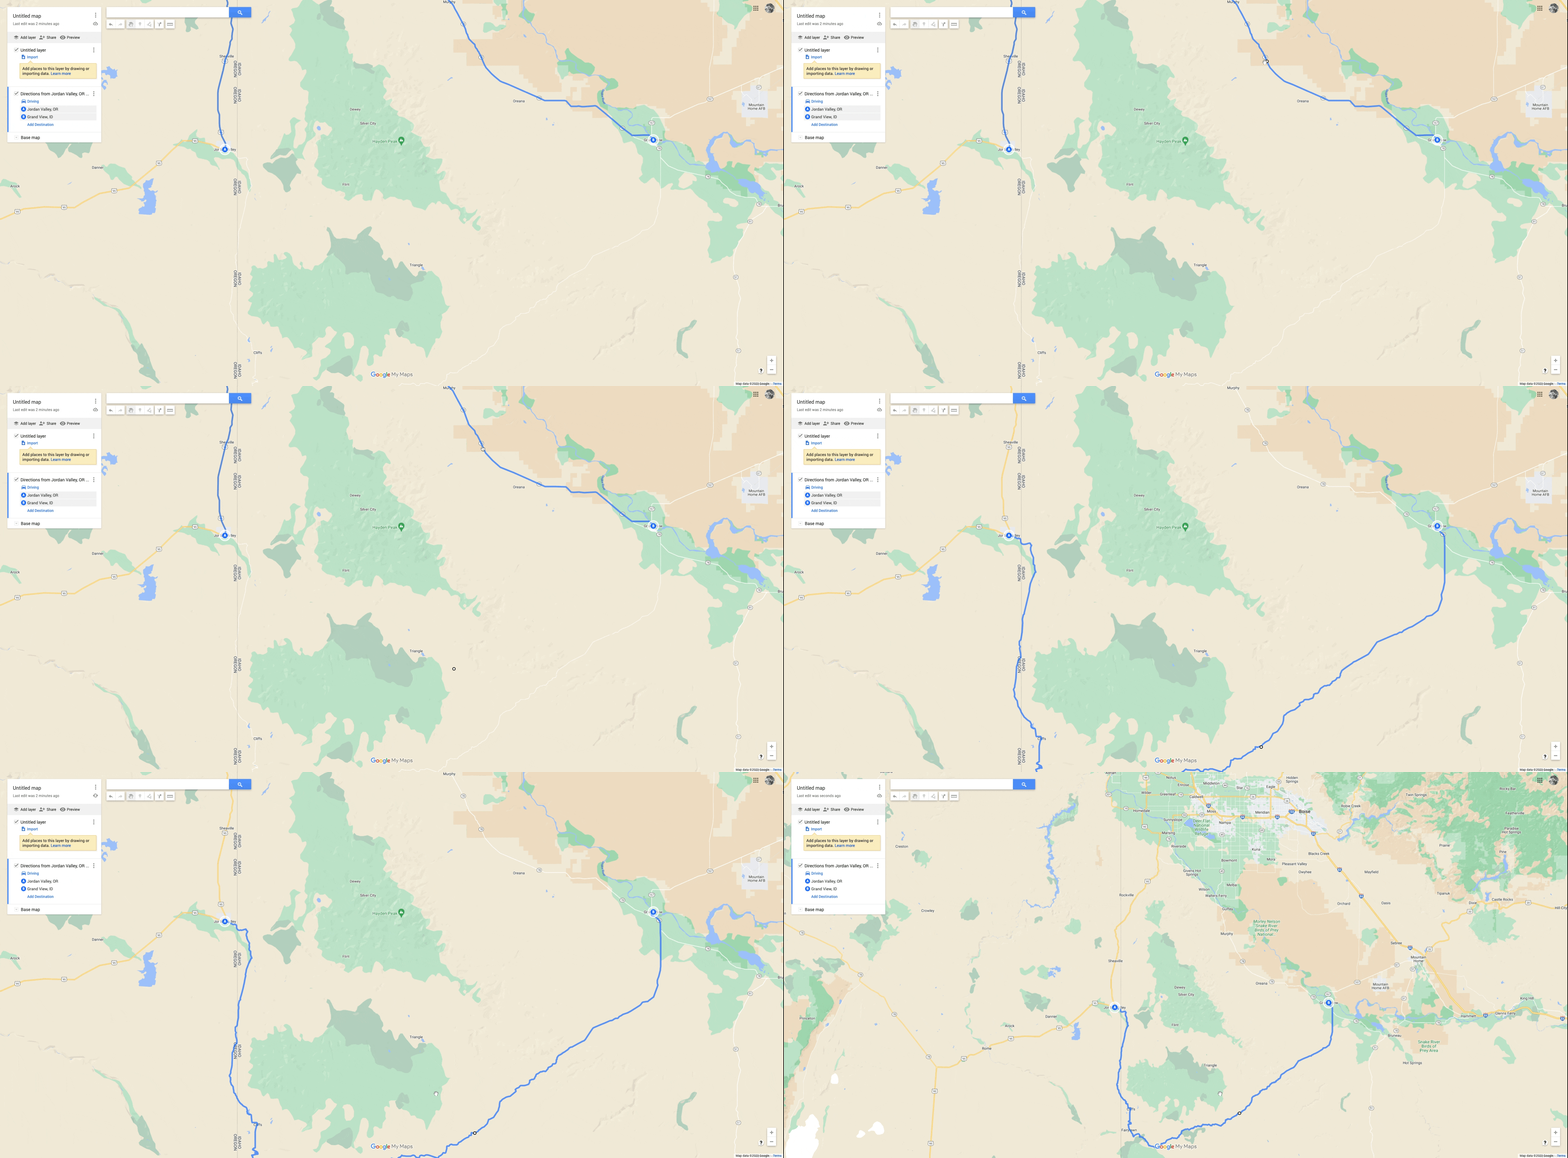
  9. Now lets say you don’t like the route it has chosen for you and you would prefer to take another route, you can drag the route line to the route you want to take you just have to make sure you are zoomed in enough to see the road you would prefer to take
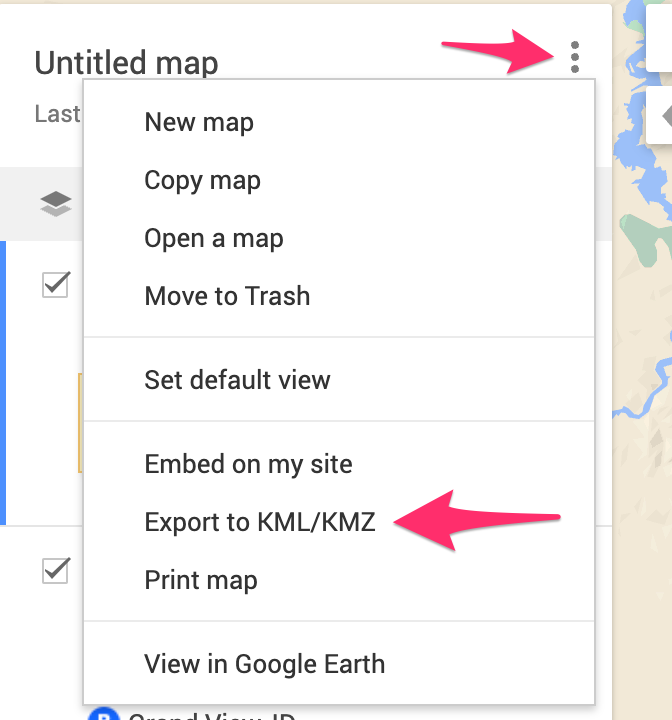
  10. After you’ve mapped out your route you can save it as a KML file that can be imported into Garmin Explore, to do this click the 3 vertical dots next to the title of the map and select “Export to KML/KMZ”
  11. On the Export popup select the layer you want to export, don’t do the entire map, keep the other checkboxes unchecked
  12. Click the download button
  13. To import it go to the Importing section blow

Creating an off-road route

You can use Google Earth Pro to create on and off-road maps but I prefer to use it for off-road routes.

  1. Open Google Earth
  2. Create a new folder under My Places by right-click on the “My Places” folder, selecting Add -> Folder
  3. Name the folder
  4. Select the folder
  5. Click the “Add” menu and select “Path”
  6. With the path dialog open click on the map where you want to start from and then start clicking at each point on the map you want the route to take you
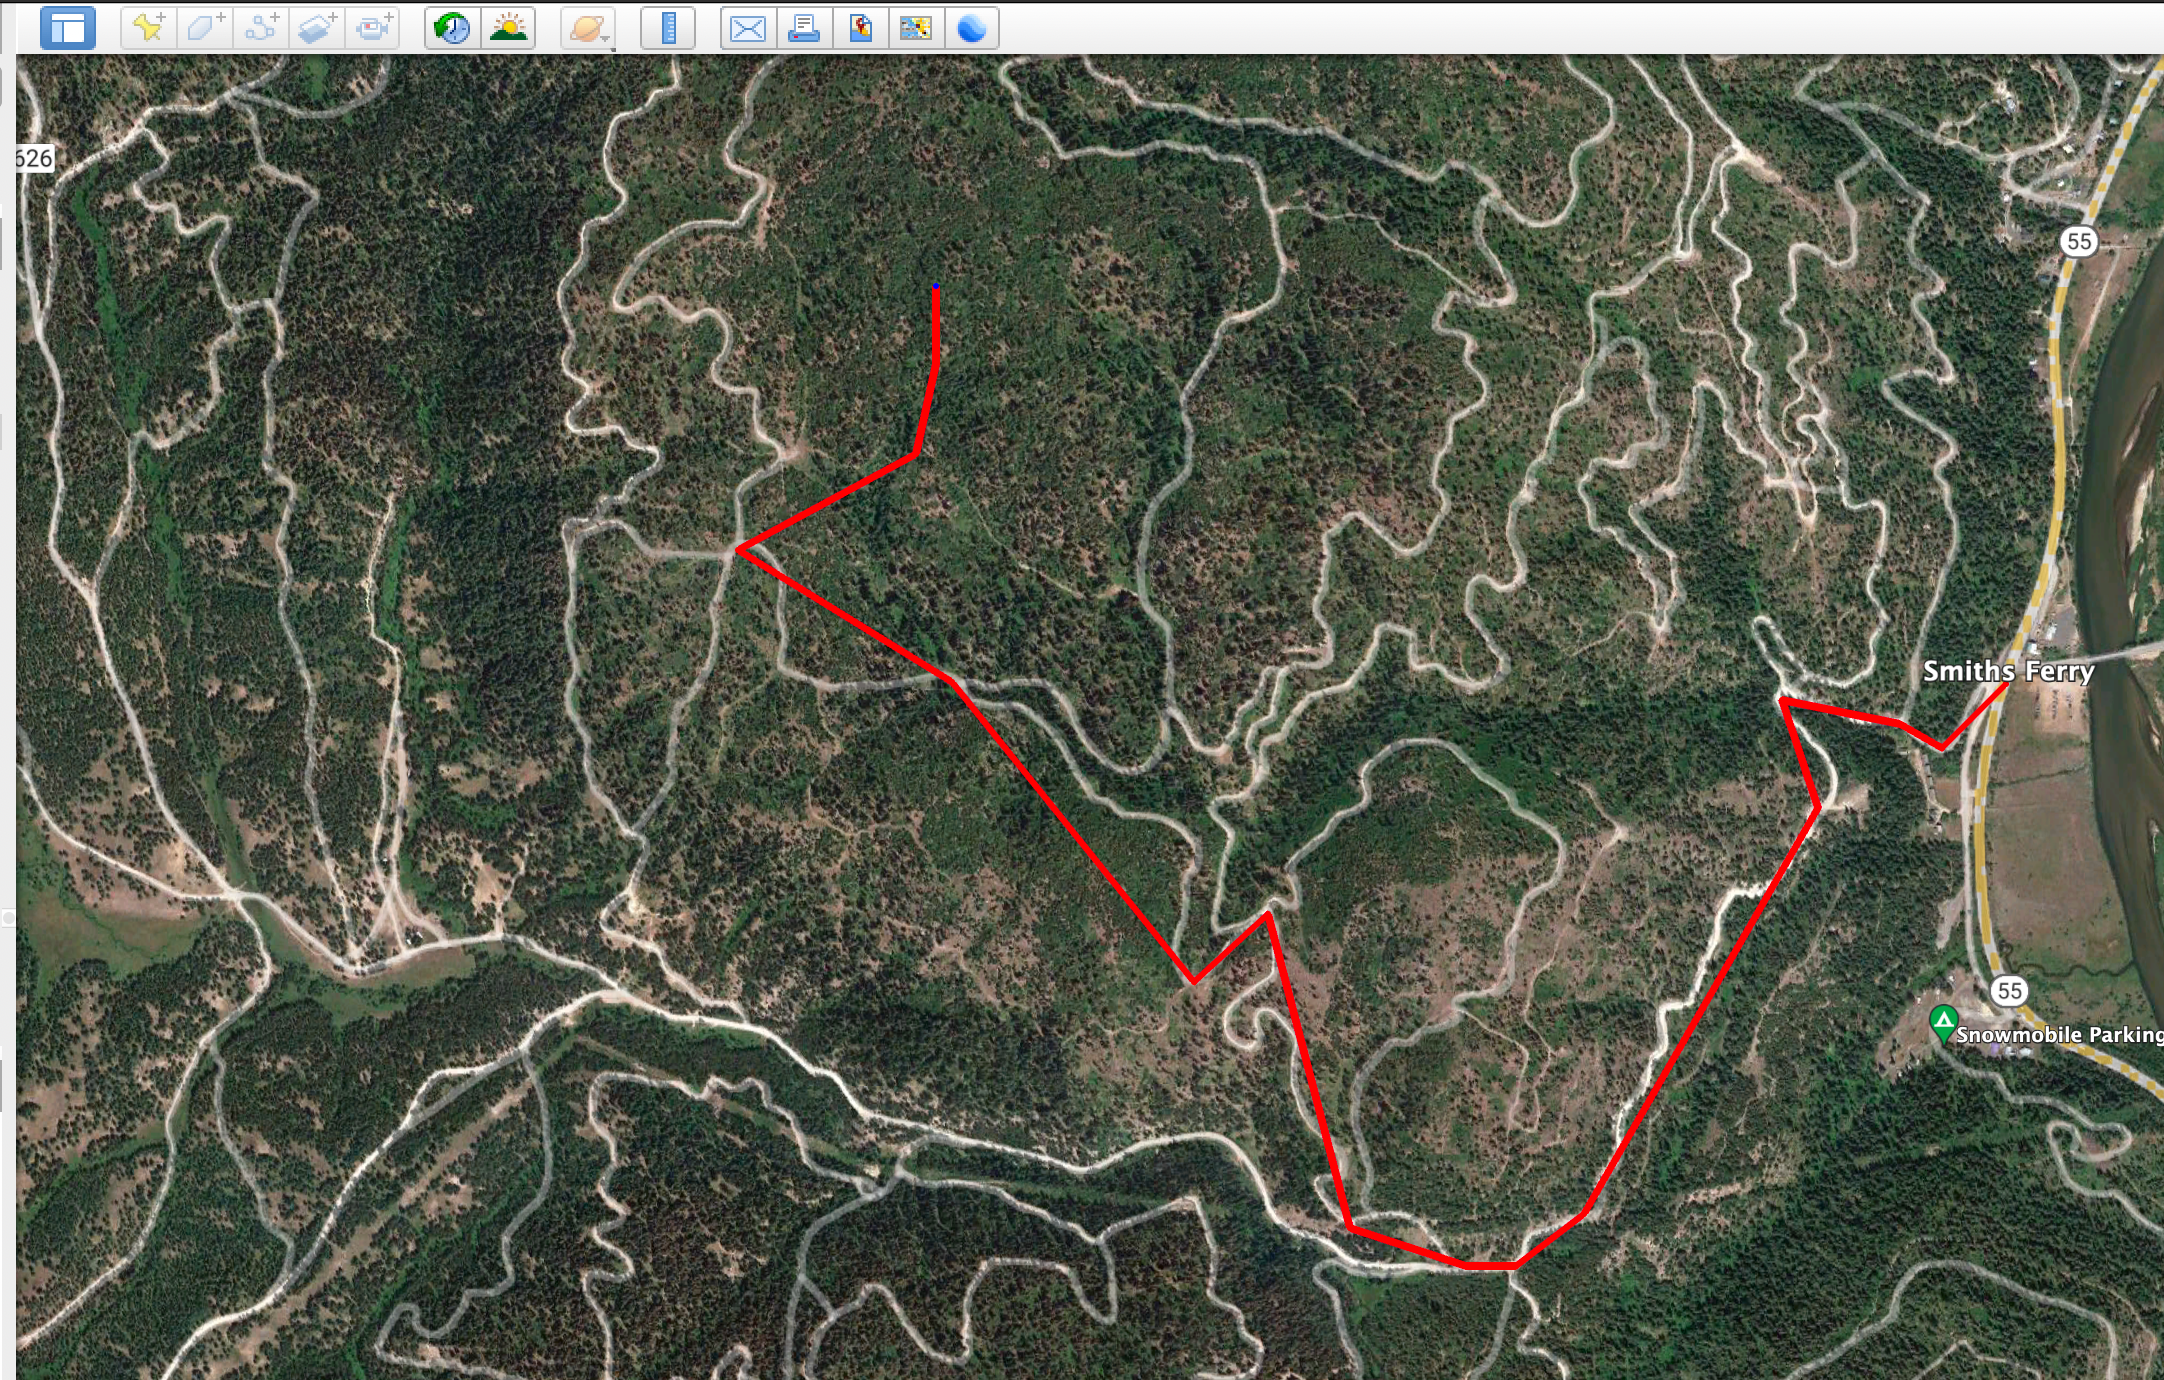
  7. You can create multiple paths and export them all and individual tracks
  8. To save as a KMZ file, select the folder or path you want and click the “File” menu “Save” -> “Save Place As…”
  9. Name it what you want and select “Kmz (*.kmz)” as the file type to save as
  10. Save the file and move to the Importing section below

Importing into Garmin Explore

Now that we have a KMZ file we can import it into Garmin Explore and then sync with your Garmin GPS device

  1. Go to https://explore.garmin.com/ and login
  2. Browse to the “MAP” tab
  3. On the top right of the “MAP” tab select the import button, it looks like a down arrow
  4. On the Import Data popup select “Import As Tracks” and click “Next”, I’ve found using a track is works better then using a route but you can read about the difference here
  5. Select the collection you want to add the imported track to and click “Next”
  6. Upload the KMZ file you created and select the “Import” button
  7. And you are done, you should now be able to sync your collections with your Garmin GPS and the new track should show up and work
Fixing a SICASS Universal Multi-Function Bar Switch

Last week I noticed that my high/low beam switch on my Sicass Multi-Function Bar Switch wasn’t working correctly. The high beam would be a low beam with the tail running light on and the low beam would be a low beam with the tail running light off. I contacted tech support at Sicass describing my issue and their response was “… it sounds like the rocker for the lights took a direct hit and broke the pivot points …”. Due to the unit being out of warranty I took the thing apart to see if it was something I could fix and what I found surprised and disappointing me.

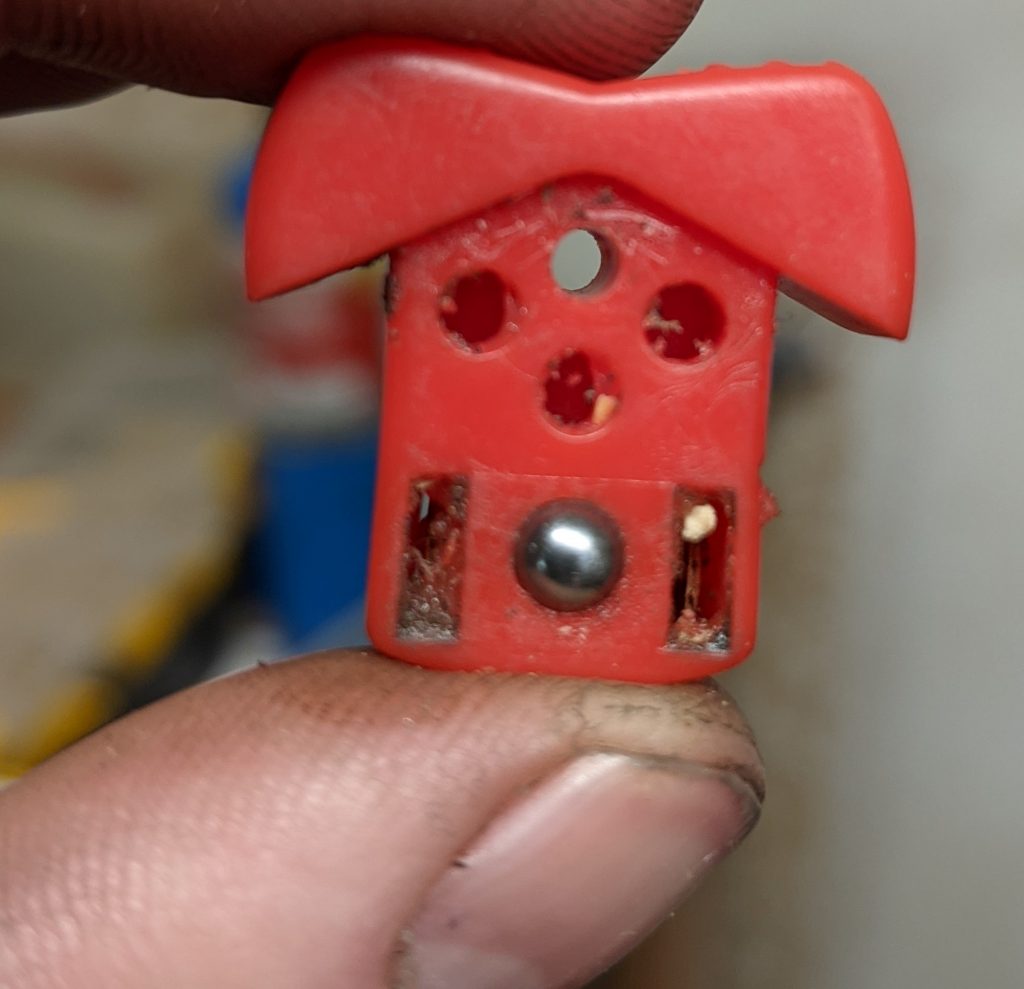
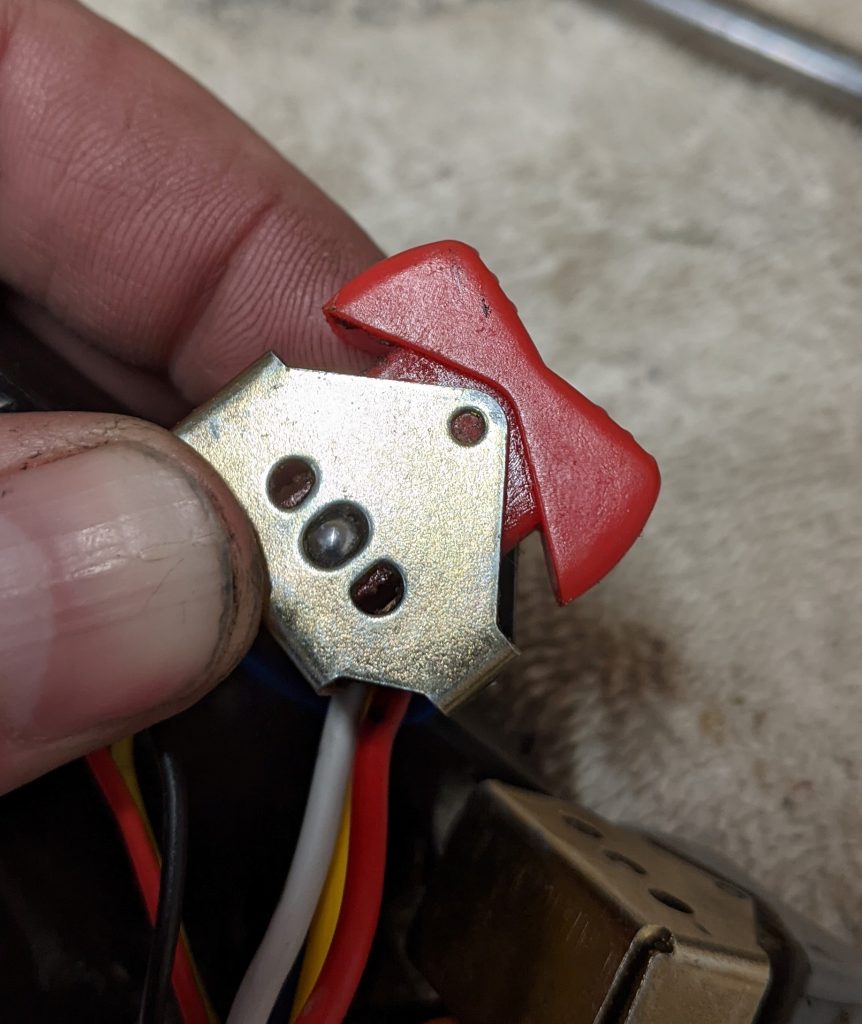
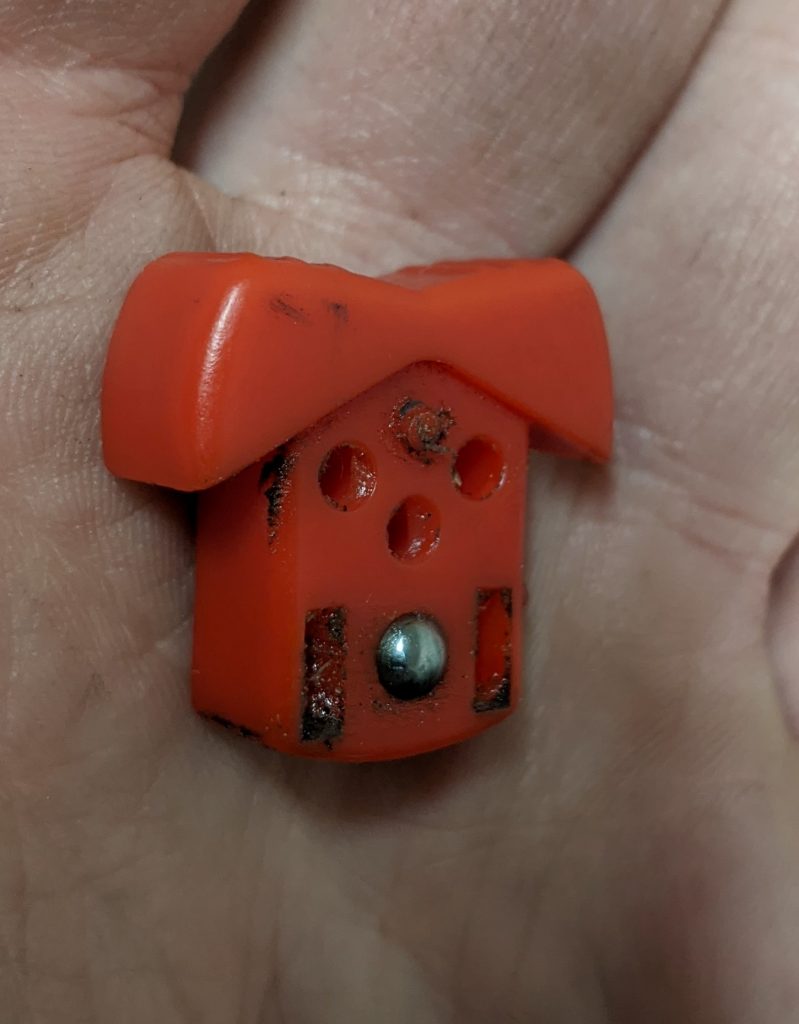
The unit has two rocker switches in it, one for controlling the lights and the other for controlling the blinkers. The rocker switches are badly designed with a small plastic pivot on each side that is used for the switch to pivot between settings.

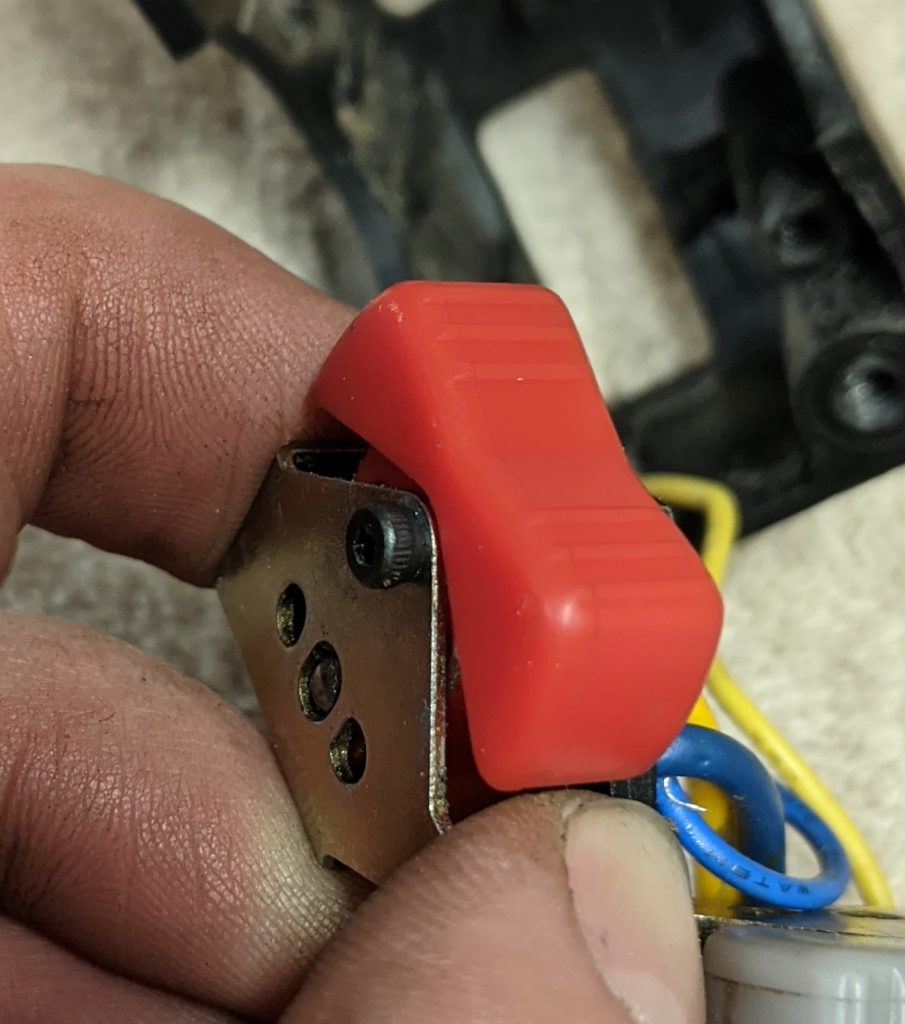
After taking it apart I verified that the issue was the switch pivots were popping out causing the connections to be incorrect. The pivots are so small and I can see that they could easily get worn out causing the unit to no longer function correctly.

The Fix

After looking it over I decided that drilling out the pivot points and running a small bolt through would be a much better solution/design.

First, take the device apart, it is pretty easy but one thing to watch for is that the horn button has a spring and if you are not careful the horn button and spring will go flying, which happened to me. If this happens to you find a mechanical pen or pencil and some of them have a spring in them that will work, I had to try three different types before I found one that worked.

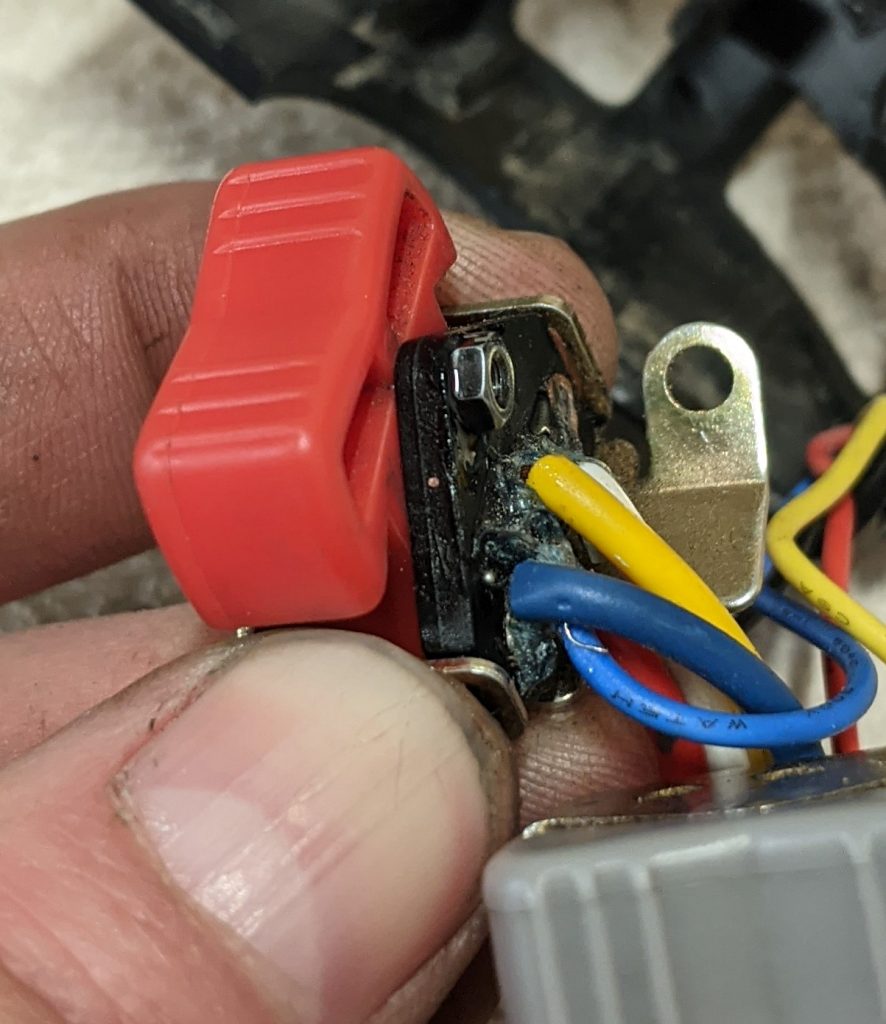
Next, pull the rocker switch out and then drilled out the pivot points with an M2 sized drill bit. Then put the switch back in and run an M2 bolt through. I used some thread lock and finger tined the nut down and that seemed to do it.

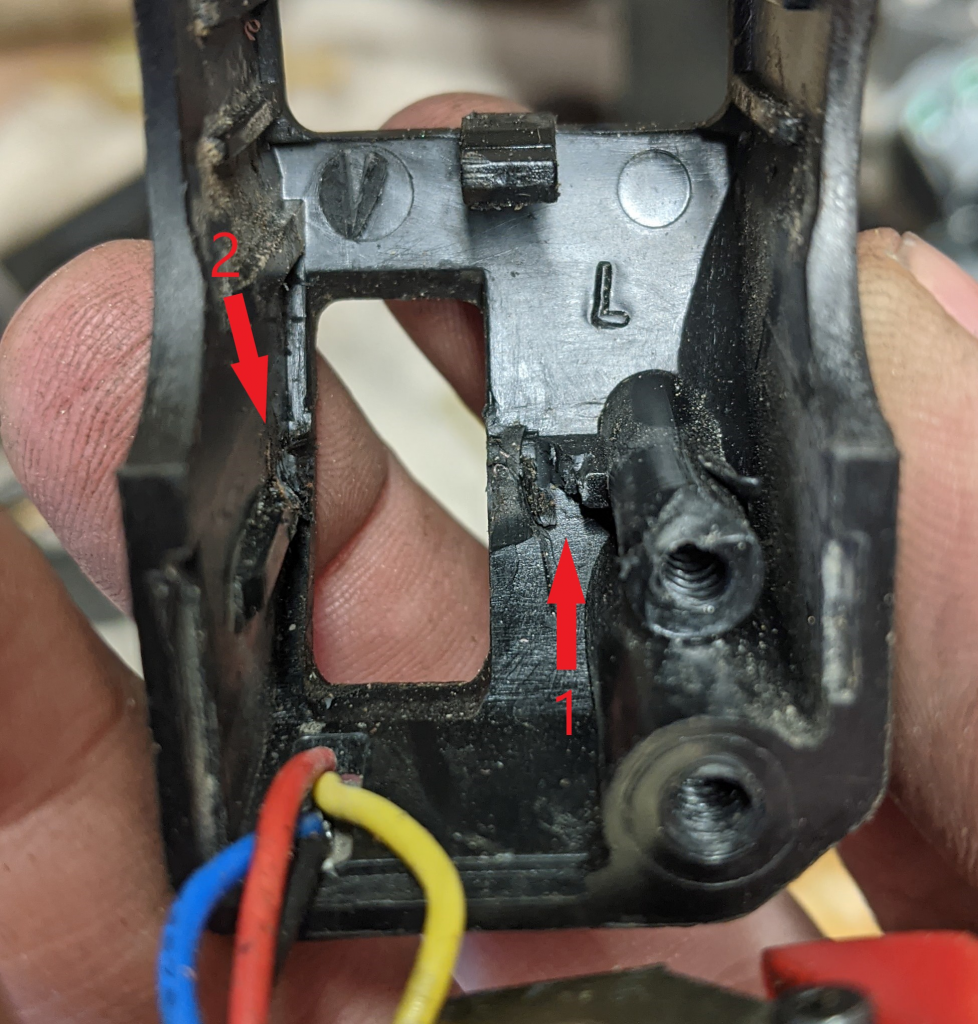
After verifying the fix worked and the lights were working correctly I had to put it back together. One issue I came across while putting it back together was due to the size of the bolt head and nut it no longer fit correctly in the case. I cut out two sections on the case to make it fit.

  1. I removed the small tab
  2. I cut out a bit of the case that sticks out

After getting it back together and mounted back on the bike everything worked as expected and it is now stronger than its original design.

Sicass Part # that this should work for:

  • 26-040
  • 26-042

Motorola Droid Turbo – Disable QI charging popup overlay

I’ve had a Motorola Droid Turbo for almost a year now and one of my biggest complaints is that while wirelessly charging on a QI charger a overlay would popup every few seconds even if the screen was unlocked. Today I noticed a system app running called “Inductive Charger” so I thought maybe I can somehow mess with that app to disable the really irritating popup overlay.

Steps to disable overlay

  1. Goto Settings->Apps
  2. Swipe to the “All” tab
  3. Find the app called “Inductive Charger” and open it
  4. Click the “Disable” button

You’re done, your phone will still charge on a QI charger but you wont get that irritating popup.

PostgreSQL: Change column casting type to another type

Because there have been a few times that I have needed to adjust a column in PostgreSQL from one type of casting to another I am going to put it here so I can find it again and for anyone else that may be looking to do the same thing.

ALTER TABLE table_name ALTER COLUMN column_name TYPE INTEGER USING column_name::INTEGER

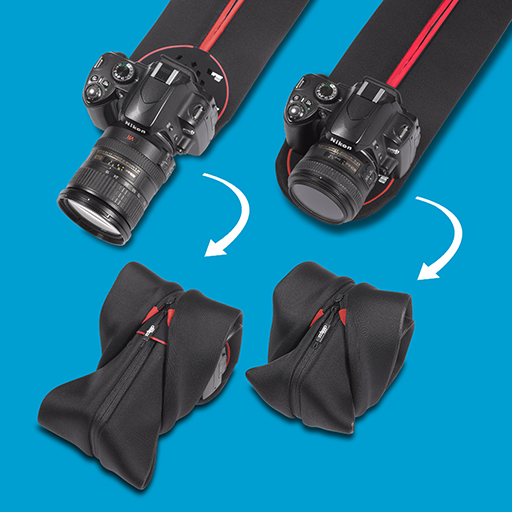
Miggo Strap and Wrap for DSLR Cameras – Review

enter image description here

The Miggo is a product that was funded by a Kickstart campaign and is described as follows:

“Serves as a camera strap which morphs into a compact and padded camera carrier”

Sounds kind of nice, no?
I thought it sounded nice so I backed the campaign and like most Kickstart campaigns forgot about it. A few months after I backed the campaign, about 8, I received my black Miggo Strap and Wrap and here are my impressions.

My first impression was that it is well built and seems like it will hold up to the test of time. It did seem to be a bit balky, but in my opinion that is necessary to be able to pad the camera.

My impression after testing it on my Canon 6D and my old Canon 350D, both of which had a Canon 24-105mm f/4L lens on, is that it was NOT designed for professional or larger DSLR cameras, it just didn’t fit well on my Canon 6D.

Pros:

  • Easy to install.
  • Protects the back and top screens while it is wrapped up.
  • Well built.
  • Fits over the shoulder when the strap is adjusted for smaller lens like the Canon 35mm f/2 IS

Cons:

  • Not designed for larger DSLR cameras, it works well on my old Canon 350D but only kind of works on my Canon 6D.
  • The pouch for the lens cap only works if you are running a lens with a cap size around 52mm, professional lens which normally have a lens cap size of 77mm+ will not fit.
  • It’s a bit long on the shoulder when adjusted for a larger lens like the Canon 24-105mm f/4L.
  • You have to take the strap off and change the mounting screw position for different size lens.

I would recommend a Miggo if the following sounds like you: You have a smaller DSLR cameras, you don’t change lens very often and/or you keep you camera in a hand bag or other such bag, otherwise I would go with something from Peak Design.

The Best Grilled Cheese

A grilled cheese sandwich is one of those foods that, when done right, can make you feel just a bit better about life when you are having a bad day. Below I will show you how I create MY perfect grilled cheese sandwich and I hope some of you find it as good as I do.


Ingredients

The bread, to me, is the most important part of the sandwich. If the bread is too sweet or does not crisp up right it can ruin the sandwiches flavor, texture, and appearance and all three are required for good food.

I like using one of three kinds of bread:

  • Sourdough for its sour flavor which adds a lot to the overall taste of the sandwich.
  • Fuchsia because it crisps up nicely while still being soft in the middle.
  • Rye (marble or other) for the strong rye, and depending on the type herb, flavor that it has.

The cheese can be any kind of cheese, except for the fake cheeses like american and Velveeta. I prefer to use either a good aged cheddar or a dubliner cheese. The key is that the cheese needs to melt relatively easily so hard cheeses like parmesan don’t work well.

You will also need butter, lots of butter.


Prep

  1. Cut bread to desired thickness, if you like it crispier than cut it thinner and if you like it softer in the middle then cut it thicker.
  2. Grade 1.5 times more cheese than you plan on putting inside the sandwich.
  3. Butter both sides of each slice of bread.
  4. Heat a pan that is large enough to fit both pieces of bread in it side by side and put about 1/8 stick of butter into the pain.
  5. When the butter in the pan is fully melted put the slices of bread in side by side.
  6. When the bread is at the desired crispness on one side do the following:
    1. Flip one slice.
    2. Put the cheese you want to use for the inside on the cooked side of that slice.
    3. Put the cooked side of the other slice on top of it.
    4. Add some more butter to the pan.
    5. Put half of the remaining cheese on the top slice so that the cheese is facing out.
    6. Flip the full sandwich and do the same to the new side.
  7. You are now frying the cheese that is on the outside of the sandwich in the butter making a nice fried cheese crust on the outside of the sandwich.
  8. When both sides have been cooked and the cheese on the outside is crispy you are done cooking my perfect grilled cheese sandwich.

After the sandwich has cooled down a bit it is ready to eat; or you can add something to make it that much better. I like to add my homemade Sauerkraut, tomatoes and/or bacon.

Hope you enjoy it as much as I do.

Sauerkraut

For the past year or so I have been fermenting my own sauerkraut and in that time I have had a few inquiry into my process and recipe so I figured that while it is a standard process and recipe I would post about it anyways.

Items I use:

  • Sharp knife (http://amzn.com/B008M5U1C2)
  • Potato masher (http://amzn.com/B00004OCJK)
  • Big boll
  • A big cutting board
  • Some kind of weight that will fit in your fermentation pot, if you get a Harsch it will come with some stones that fit inside.
  • and the most import item, a fermentation pot. There are a number of different types and sizes, I have a 10 liter Harsch Fermenting Crock Pot, but you can get something cheaper that works just as good, for example you can pick up a Pickle-Pro vegetable Fermenting top and a canning jar with the correct sized top. I haven’t used the Pickle-Pro but you can read a review of a number of different fermentation pots at nourishingtreasures.com

My recipe is very basic, I use salt (I like to use Himalayan salt), caraway seed and cabbage, that is all. I plan on making my next batch with cumin seed and I also plan on making a batch using juniper berries but as of yet I haven’t used anything other then caraway seed.

My Steps

  1. Peel a few of the big leaves off the cabbage and save them for later use.
  2. I cut all the cabbage up into thin slices and put it in a bowl (I use about 5 big green cabbages to fill my 10 liter pot).
  3. After all the cabbage is cut I put a handful in my fermentation pot, I add salt (about 2 tablespoons, it is safer to add more then not to have added enough) and some of the caraway seed (about 1/2 tablespoon).
  4. I then use my hands and mix it up.
  5. After the salt, seed, and cabbage is mixed up I use the potato masher to pack the cabbage to the bottom of the pot.
  6. Repeat steps 3-5 tell the pot is about 3/4 to 5/6 of the way full.
  7. Put the big leaves you set aside in step 1 so that they cover the cabbage in the pot and then put the weight on top of them.
  8. At this point, depending on the type of cabbage you used, you may have enough water, from the cabbage, to have covered the weight by about an inch. If you don’t have enough water in the pot then add enough cold water to cover the weight by about an inch and add more salt.
  9. Scrape any floating debris off the surface of the water and discard.
  10. Seal the pot and put in a dark cool place and let sit and if your pot has a sealing well then keep it filled with water.

I let my batches sit for 4 to 8 weeks.

Teaching Children about Death

How do you explain the gravity of death and killing something/someone to a 7 year-old in a manner they will understand?

Today my oldest (just over 7.5 years old), while somewhat upset, told his mother that he wanted to “kill himself”. Killing one’s self is not something that has ever come up in conversation or been something he has been exposed to, even with it being one of the top ways people die today (https://en.wikipedia.org/wiki/Suicide#Epidemiology), and after talking with him for a little bit, with relefe, I realized that he didn’t understand what it meant.

I sat him down and tried to explain how much it would hurt the people around him if he was to die and how death or killing one’s self has a permanent outcome that would prevent him from ever doing anything ever again, whether it would be playing with Lego’s or fighting with his brother it was the end-all-be-all to what he does and knows today.

Having this conversation with him I realized that in today’s society children are exposed less and less to death and what the outcome of killing something is. When I was a kid I had pets that were killed by other animals, I had killed fish after fishing and had seen birds of prey injure other birds to the point that they were suffering and the falconer had to kill them by hand, so while I didn’t truly understand what death was, if anyone ever does, I had seen the outcome of death and had an appreciation for it.

So now I am trying to figure out humane ways to give my son the experience of death, I will take him fishing and maybe hunting and I think I will send him with his grandfather to see how falcons catch their food but I can only hope this gives him some perspective on life and death.

How do/did you teach your kids about death or have you done so or even thought about doing so?

Guessing the next occurrence in a date/time sequence

Analyzing a sequence of dates to determine the best guess for when the next event will accor is something best left to statistical modeling tools, but I’m going to try and show you a very basic way to do exactly that using PHP and an array of date/time stamps.


First off the data/time stamp sample array:

$time_stamps = array(
    "5/10/2013 9:30",
    "5/11/2013 9:50",
    "5/12/2013 10:20",
    "5/13/2013 10:59",
    "5/14/2013 11:22",
    "5/15/2013 11:51",
    "5/16/2013 12:28",
    "5/17/2013 12:57",
    "5/18/2013 13:13");

Sense the object of this exercise is to guess the next occurrence we are going to need a function that analyzes the difference between the times and then gives us an average based on that difference.

 function get_average($time_array)
 {
      $total = "";
      $last = "";
      $count = count($time_array);
      for($t=0;$t<$count;$t++)
      {
           $time = $time_array[$t];
           if($t == 0)
           {
                $last = $time;
           } else {
                $diff = get_diff($last, $time);
                $last = $time;
                $total += $diff;
           }
      }
      $average = ($total/($count-1));
      return round($average);
 }

 function get_diff($time1, $time2)
 {
      $t1 = strtotime($time1);
      $t2 = strtotime($time2);
      $diff = ($t2 - $t1)/60;
      return $diff;
 }

In the above function “get_average” you will see the for loop running through the array of date/time stamps and calling the function “get_diff”. The first time the loop runs it sets the varable $last to the first date/time stamp, this is to give us a starting point otherwise when we ran the “get_diff” function it would return an error or a number based on a date out of our sample rage and would therefore make are guess extreamly inaccurate, instead of just somewhat being inaccurate. The get_diff function compaires the last date/time sample and the current date/time sample in the array and returns the differance in minutes, that time is then added to the $total. Once all the items in the array have been calculated the $total is divided by the count of the date/time stamp array minus one (1), we minus one (1) because the first value of the array is not calculated, it is just a starting point to calculate the difference of the next value in the array.

 function guess_next($date_array)
 {
      $diff_avg = get_average($date_array);
      $last_date = new DateTime(end($date_array));
      $last_date->add(new DateInterval('PT'.$diff_avg.'M'));
      $next = $last_date->format('m/d/Y H:i');
      return $next;
 }

We now have the average increase in time to base our prediction on and we can use the above function to tie it all together. We take the last date in the date/time stamp array and add the average to that date and then format it to a readable format and we are done. The next occurrence will most likely occur around “05/19/2013 13:41”.

Obviously this isn’t going to be super accurate but it will provide a “best guess” based on the data provided. If anyone has a better algorithm for guess the next occurrence in a date/time array I would love to see it.

Thanks for reading!


Full code:

 function get_average($time_array)
 {
      $total = "";
      $last = "";
      $count = count($time_array);
      for($t=0;$t<$count;$t++)
      {
           $time = $time_array[$t];
           if($t == 0)
           {
                $last = $time;
           } else {
                $diff = get_diff($last, $time);
                $last = $time;
                $total += $diff;
           }
      }
      $average = ($total/($count-1));
      return round($average);
 }

 function get_diff($time1, $time2)
 {
      $t1 = strtotime($time1);
      $t2 = strtotime($time2);
      $diff = ($t2 - $t1)/60;
      return $diff;
 }

 function guess_next($date_array)
 {
      $diff_avg = get_average($date_array);
      $last_date = new DateTime(end($date_array));
      $last_date->add(new DateInterval('PT'.$diff_avg.'M'));
      $next = $last_date->format('m/d/Y H:i');
      return $next;
 }

 $date_stamps = array(
      "5/10/2013 9:30",
      "5/11/2013 9:50",
      "5/12/2013 10:20",
      "5/13/2013 10:59",
      "5/14/2013 11:22",
      "5/15/2013 11:51",
      "5/16/2013 12:28",
      "5/17/2013 12:57",
      "5/18/2013 13:13");

 print(guess_next($date_stamps));

Gerber Knifes

For about a year or two I’ve owned a Gerber Applegate-Fairbairn that I have found to be a very nice knife for under $100. It holds a good edge, its light, and it’s not to small nor to big.

About a month ago I was messing with it to see if I could adjust the location of the belt clip and somehow stripped out the belt clip screws. I talked with Gerber and they sent me a set of new screws and through-in a new belt clip as well. I tried putting the new screws in and came to the realization that the screw holes were stripped out as well, so I contacted Gerber again and they told me to send the knife in.

Well today, about a week and a half after I sent the knife in, I received a package from them and in it was a brand new knife.

Thank you Gerber!